The Ultimate Computer Server Rack Guide for NZ Businesses
- Jan 24
- 17 min read
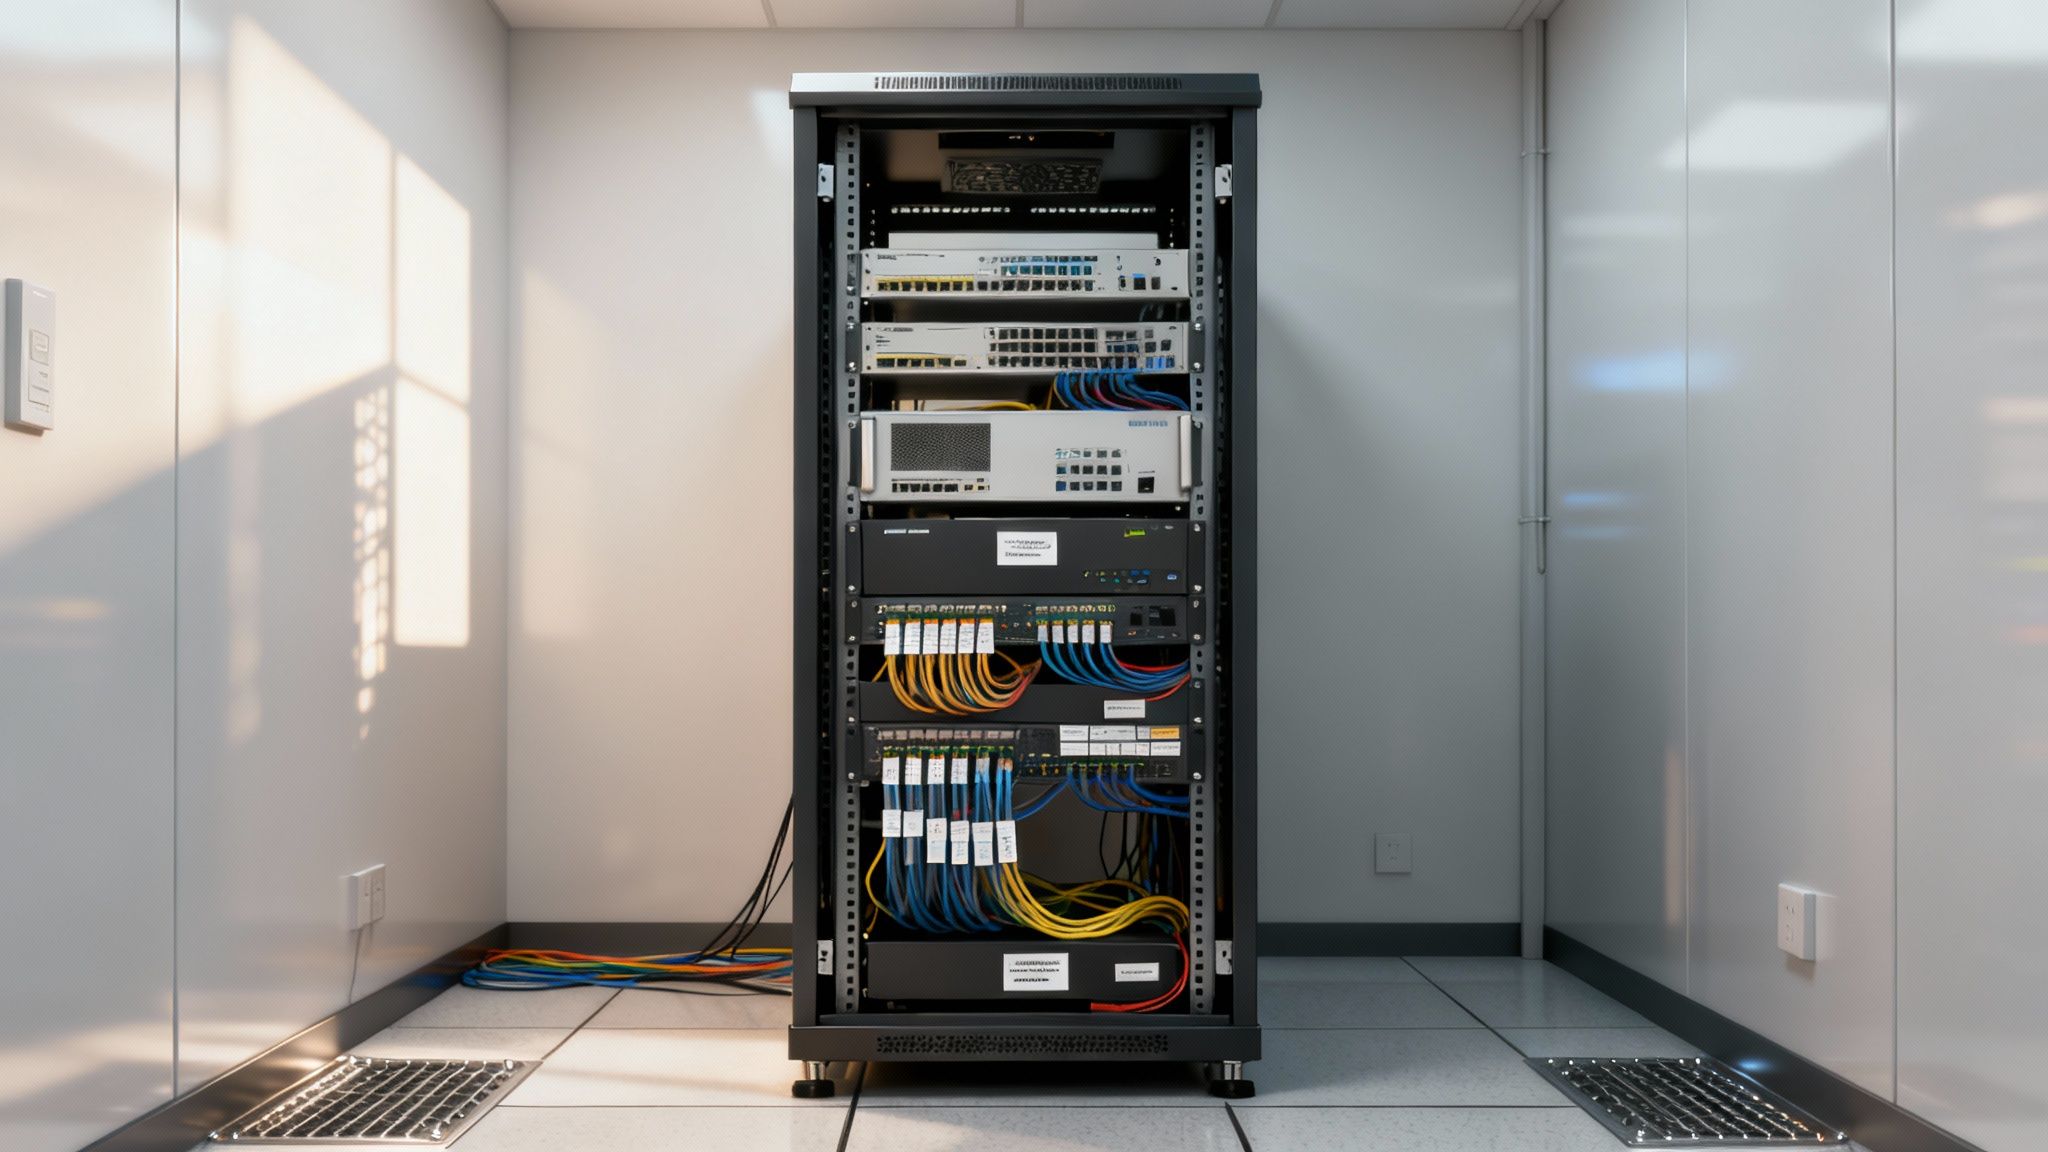
Think of a server rack as the backbone of your IT operation. It's a purpose-built steel and aluminium frame designed to house all your critical hardware—servers, switches, routers, you name it. It's essentially a high-tech shelving unit, but one that transforms a potential mess of cables and overheating gear into a secure, organised, and efficient system. For any Kiwi business that runs on technology, it’s the bedrock of a stable network.
The Foundation of Your IT Infrastructure
Imagine trying to run a library by just piling books on the floor. It’d be a chaotic mess. You wouldn't be able to find anything, the books would get damaged, and the whole system would grind to a halt. A server rack solves this exact problem for your technology, giving it the structure, safety, and room to grow that it needs.
Without a proper rack, expensive servers and networking gear often end up stacked on desks or shoved into dusty cupboards. This isn't just untidy; it's a recipe for disaster. This kind of setup kills airflow, causing crucial components to overheat and fail years before they should. It also turns maintenance into a nightmare, forcing technicians to wrestle with a tangled web of cables just to reach a single device.
Solving Critical IT Challenges
A server rack is far more than just a piece of furniture; it’s a strategic tool that solves several core operational headaches right off the bat. The moment you centralise your hardware into a rack, you immediately gain control over your environment.
Here are the key problems a server rack solves:
Improved Airflow and Cooling: Racks are specifically engineered to promote proper airflow, preventing the build-up of damaging heat and extending the lifespan of your valuable equipment.
Simplified Maintenance: With everything neatly mounted and cabled, your IT team can access, service, or replace components in minutes, not hours. That means less downtime for your business.
Enhanced Physical Security: Enclosed rack cabinets can be locked to stop unauthorised access, protecting your sensitive data and expensive hardware from theft or tampering. This guide to designing server cages offers some great insights into taking that physical security to the next level.
Efficient Use of Space: Racks let you build up, not out. By stacking equipment vertically, you make the most of your floor space—a massive advantage for any growing business where every square metre counts.
A well-organised rack is the bedrock of a reliable network. It directly supports everything from managed IT services to business process automation, ensuring your digital operations run smoothly and efficiently.
The Growing Demand in New Zealand
You don't have to take our word for it—the market trends tell the same story. New Zealand's data centre rack market was valued at USD 5.34 billion in 2024 and is expected to nearly double to USD 10.88 billion by 2032, growing at a compound annual growth rate of 9%.
This boom is being driven by the massive shift to cloud computing and the relentless need for scalable infrastructure to support digital growth. As more Kiwi businesses move their operations to the cloud, the demand for high-density rack systems to house all that server and storage power just keeps climbing. You can learn about local data centre providers and services in our complete guide to get a better sense of what's happening on the ground here in NZ.
How to Choose the Right Server Rack Size
Picking the right size for your server rack is probably the most critical decision you'll make when setting up your IT infrastructure. Get it wrong, and you're setting yourself up for headaches, equipment that doesn't fit, or a costly replacement sooner than you think.
Think of it like buying a garage. You need to know it's tall enough for your vehicle, wide enough to open the doors, and deep enough to park without scraping the back wall—with a bit of room to spare. A server rack is no different; it just has its own language for height, width, and depth.
Understanding Rack Height in U Space
In the world of server racks, we don't measure vertical space in centimetres or inches. We use Rack Units, or simply ‘U’. This is the universal standard for any equipment designed to be mounted in a rack.
One Rack Unit (1U) is a standard measurement of 1.75 inches (44.45mm). Any piece of gear, whether it's a server, a network switch, or a power unit, will have its height defined in 'U'—like a 1U server or a 2U Uninterruptible Power Supply (UPS).
So, how do you figure out the height you need? Start by making a list of everything you plan to install. Add up the 'U' space for all of it. For instance, if you have three 2U servers (6U total), a 1U switch (1U), and a 2U UPS (2U), you're looking at a 9U requirement right off the bat.
But just buying a 9U rack would be a classic rookie mistake. You have to plan for what’s next.
Plan for Growth: A good rule of thumb is to add at least 25-30% more capacity than you currently need. For our 9U setup, that means you should be looking for a rack with at least 12U of usable space.
Allow for Management: It's also smart to leave 1U or 2U of empty space for things like cable management panels or blanking plates, which dramatically improve airflow and keep things tidy.
Suddenly, that immediate 9U need has turned into a much more realistic 15U plan. For small businesses, a 24U half-rack is a fantastic starting point. For larger operations or those expecting serious growth, the industry-standard 42U full-height rack is the way to go.
Before we move on, let's look at how these U-sizes translate to real-world applications.
Common Server Rack Sizes and Their Typical Use Cases
This table compares popular rack unit (U) sizes to help businesses choose the right capacity for their needs, from small offices to growing data centres.
Rack Size (U) | Height (Approx.) | Typical Use Case | Capacity Example |
|---|---|---|---|
12U - 18U | 61cm - 89cm | Small businesses, retail stores, or network closets with minimal hardware. | A few servers, a switch, a patch panel, and a small UPS. |
22U - 27U | 107cm - 130cm | Growing small-to-medium businesses (SMBs) needing a balance of size and capacity. | Multiple servers, network gear, storage, and room for future expansion. |
42U | 201cm (Full-Height) | The standard for data centres, enterprise server rooms, and colocation facilities. | High-density computing with dozens of servers, switches, and storage arrays. |
48U+ | 226cm+ | Large-scale data centres and hyperscale environments needing maximum density. | Optimised for packing as much computing power as possible into one footprint. |
Choosing the right size is about finding that sweet spot between your immediate needs and your five-year plan.
Standard Width and Why It Matters
While the height of a rack can vary, the internal mounting width is almost always the same: a standard 19 inches (482.6mm). This measurement was established by the Electronic Industries Alliance (EIA) to ensure that equipment from different manufacturers would be universally compatible.
This standardisation is a huge relief. It means you can confidently mix a Dell server, a Cisco switch, and a third-party storage unit in the same rack without any mounting issues. The external width of the cabinet might be wider—often 600mm or 800mm—to give you extra room on the sides for routing cables, but for most setups, a 600mm wide rack does the job perfectly.
Selecting the Correct Rack Depth
Rack depth is the dimension people forget most often, and getting it wrong can be a complete disaster. You’ll find racks with depths ranging from 600mm to 1200mm. To pick the right one, you need to think about more than just the length of your longest server.
You have to account for three things:
Equipment Depth: Start by measuring your deepest piece of gear.
Cable Clearance: You absolutely need space at the back for power and network cables. They need room to bend without putting stress on the connectors.
Airflow: Proper cooling relies on having a clear path for hot air to escape from the back of your equipment. A cramped space traps heat.
A simple, safe rule is to find the depth of your deepest component and add at least 100mm (around 4 inches) to it. For example, if your biggest server is 800mm deep, you need a rack that’s at least 900mm deep. Honestly, going for a 1000mm or 1200mm deep rack is an even better idea, as it gives you a comfortable safety margin for future hardware, which only seems to be getting deeper.
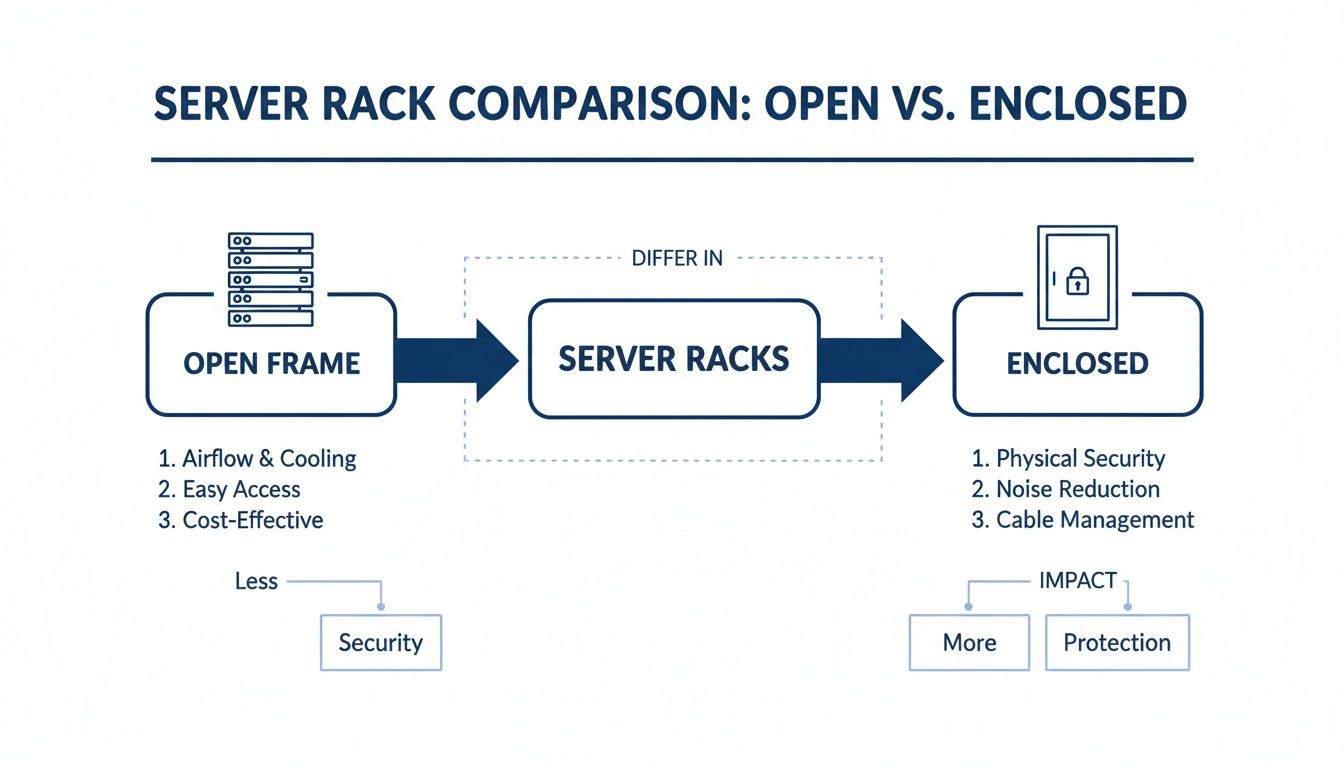
Open Frame vs Enclosed Racks: Which is Better?
Choosing between an open frame computer server rack and a fully enclosed cabinet is one of the first big decisions you’ll make when planning your IT infrastructure. Think of it like deciding between an open carport and a secure, locked garage for your most valuable tech. Each has its place, and the right choice really boils down to your specific environment and needs.
An open frame rack is all about simplicity and access. It’s essentially just the mounting rails, either in a 2-post or 4-post setup, and its biggest advantages are fantastic airflow and a lower price tag. Technicians can get to the equipment from all sides without fumbling with doors or side panels, which makes installations and maintenance a breeze.
This design is the go-to for dedicated, secure server rooms where the climate is already controlled and physical access is tightly restricted.
The Case for Open Frame Racks
If your IT gear is housed in a purpose-built space, an open frame rack brings some serious benefits that can save you time and money.
Superior Natural Cooling: With no walls to trap heat, your equipment gets the full benefit of the room's ambient airflow, cutting down the risk of overheating.
Unmatched Accessibility: Need to swap out a server or troubleshoot a dodgy cable? It’s far quicker when there are no physical barriers in your way.
Lower Initial Cost: The simpler design means open frame racks are significantly cheaper than their enclosed cousins.
Of course, that openness comes with some clear trade-offs. They offer zero physical security against someone walking up and unplugging something, and they do absolutely nothing to quieten the racket from server fans. This makes them a non-starter for shared spaces or open offices.
The Security of Enclosed Racks
An enclosed server rack, or a cabinet as it's often called, is a much more serious piece of kit. It comes with a front door, a rear door, side panels, and usually a roof, creating a self-contained and secure micro-environment for all your hardware. This design directly tackles the main weaknesses of the open frame model.
For any business where security is a top priority or where the rack has to live in a non-dedicated space, an enclosed cabinet isn't just a good idea—it's essential. It gives you physical protection, noise reduction, and precise control over the internal climate.
That level of control is vital for high-density setups. The enclosed design lets you get clever with your cooling, using internal fans to create a clear hot-aisle/cold-aisle airflow path to stop heat from building up.
These features are a perfect match for enterprise environments and are becoming more and more critical right here in New Zealand. The local data centre rack market is booming, largely thanks to huge investments from hyperscale cloud providers like Microsoft and Amazon Web Services. As part of a massive USD 7.5 billion investment, AWS launched its NZ cloud region in September 2025, which has massively ramped up demand for secure, enterprise-grade racks. With the cloud sector's IT load capacity expected to soar to nearly 30 MW by 2029, the need for high-density, secure cabinets to handle these workloads is only going to grow. You can learn more about how this infrastructure expansion supports local businesses pursuing their own digital transformation.
Making the Right Choice
Not sure which way to go? Just answer these three quick questions:
Where will the rack be located? If it’s in a secure, dedicated server room, an open frame is a great option. If it’s out in the open or in a multi-use area, you’ll need an enclosed cabinet.
How important is physical security? If the rack is holding sensitive data or expensive gear in an accessible spot, lockable doors are a must. Go with an enclosed rack.
Is noise a problem? Server fans are loud. An enclosed cabinet will make a huge difference, making it the only real choice for populated work areas.
In the end, it’s a balancing act between accessibility and cost on one side, and security and environmental control on the other.
Optimising Power and Cooling in Your Server Rack
Think of power and cooling as the life-support systems for your server rack. Get them right, and your hardware will run reliably for years. Get them wrong, and you’re just asking for unexpected downtime, fried components, and some very costly replacements.
At the end of the day, managing these two elements is less about complex engineering and more about smart, strategic planning.
Just like a high-performance engine, your servers generate a massive amount of heat as a byproduct of their work. At the same time, they need a constant, clean supply of electricity to function. These two needs are in constant conflict; the more power you use, the more heat you create, which in turn makes your cooling systems work even harder.
Nailing this delicate balance is at the heart of an efficient and healthy server environment.
Mastering Power Distribution
The foundation of reliable power in any server rack is the Power Distribution Unit (PDU). In simple terms, a PDU is a professional-grade power strip built to safely deliver electricity to multiple devices within the rack. But not all PDUs are created equal, and choosing the right one is a crucial first step.
Basic PDUs: These are your no-frills option, offering a dependable way to distribute power from a single source to your gear. They're cost-effective and perfect for small setups with straightforward power needs.
Metered PDUs: A solid step up, these units have a local display showing the total power draw. This is invaluable for preventing overloads and actually understanding your rack’s energy consumption.
Switched PDUs: For anyone managing gear remotely, these intelligent devices are a game-changer. They let you monitor power for each individual outlet and—more importantly—turn them on or off from anywhere. If a server freezes, you can reboot it without needing someone physically on-site.
Calculating your power requirements is non-negotiable. Add up the maximum power draw (in watts) of every single device you plan to install, then add a safety buffer of at least 20-25%. This stops circuits from tripping during peak loads and gives you breathing room for future upgrades.
The Art of Efficient Cooling
Cooling a server rack isn't about blasting it with freezing air; it's about managing airflow with precision. The goal is simple: get cool air to the front of your servers and get hot air away from the back as efficiently as possible. This is where the concept of hot-aisle/cold-aisle containment becomes so important.
The principle is straightforward. You arrange your racks in rows so the cold air intakes of one row face the cold air intakes of the next, creating a "cold aisle." The hot air exhausts then face each other, creating a "hot aisle." This simple layout stops hot exhaust from one server being sucked into the intake of another, which dramatically improves your cooling efficiency.
This visual comparison should help you see how different rack types affect airflow.
The infographic really highlights how enclosed racks, while great for security, demand more active airflow management to stop heat from building up.
Some simple, low-cost tools can make a massive difference in keeping that air separated:
Blanking Panels: These are cheap, simple plates that cover unused U-space in your rack. They're essential for stopping hot and cold air from mixing, forcing the cool air through your equipment where it’s actually needed.
Vented Doors: For enclosed cabinets, doors with high perforation (over 65%) are critical for letting air move freely into and out of the rack.
Rack-Mounted Fans: These units can be installed at the top of a cabinet to actively pull hot air out. This creates negative pressure that helps draw cool air in from the bottom. If you want to learn more, there's a great guide on selecting the right cooling fan to prevent your systems from overheating.
This focus on efficiency is really shaping the market here in New Zealand, where sustainability and operational costs are major concerns. The local data centre rack market is seeing high demand for modular, high-density racks that improve both power and cooling. With the NZ data centre market projected to hit USD 1.44 billion by 2030, and enterprise IT services revenue set to reach NZ$8.52 billion by 2029, it's clear that operators are prioritising AI-ready designs and efficient power usage as key purchasing drivers.
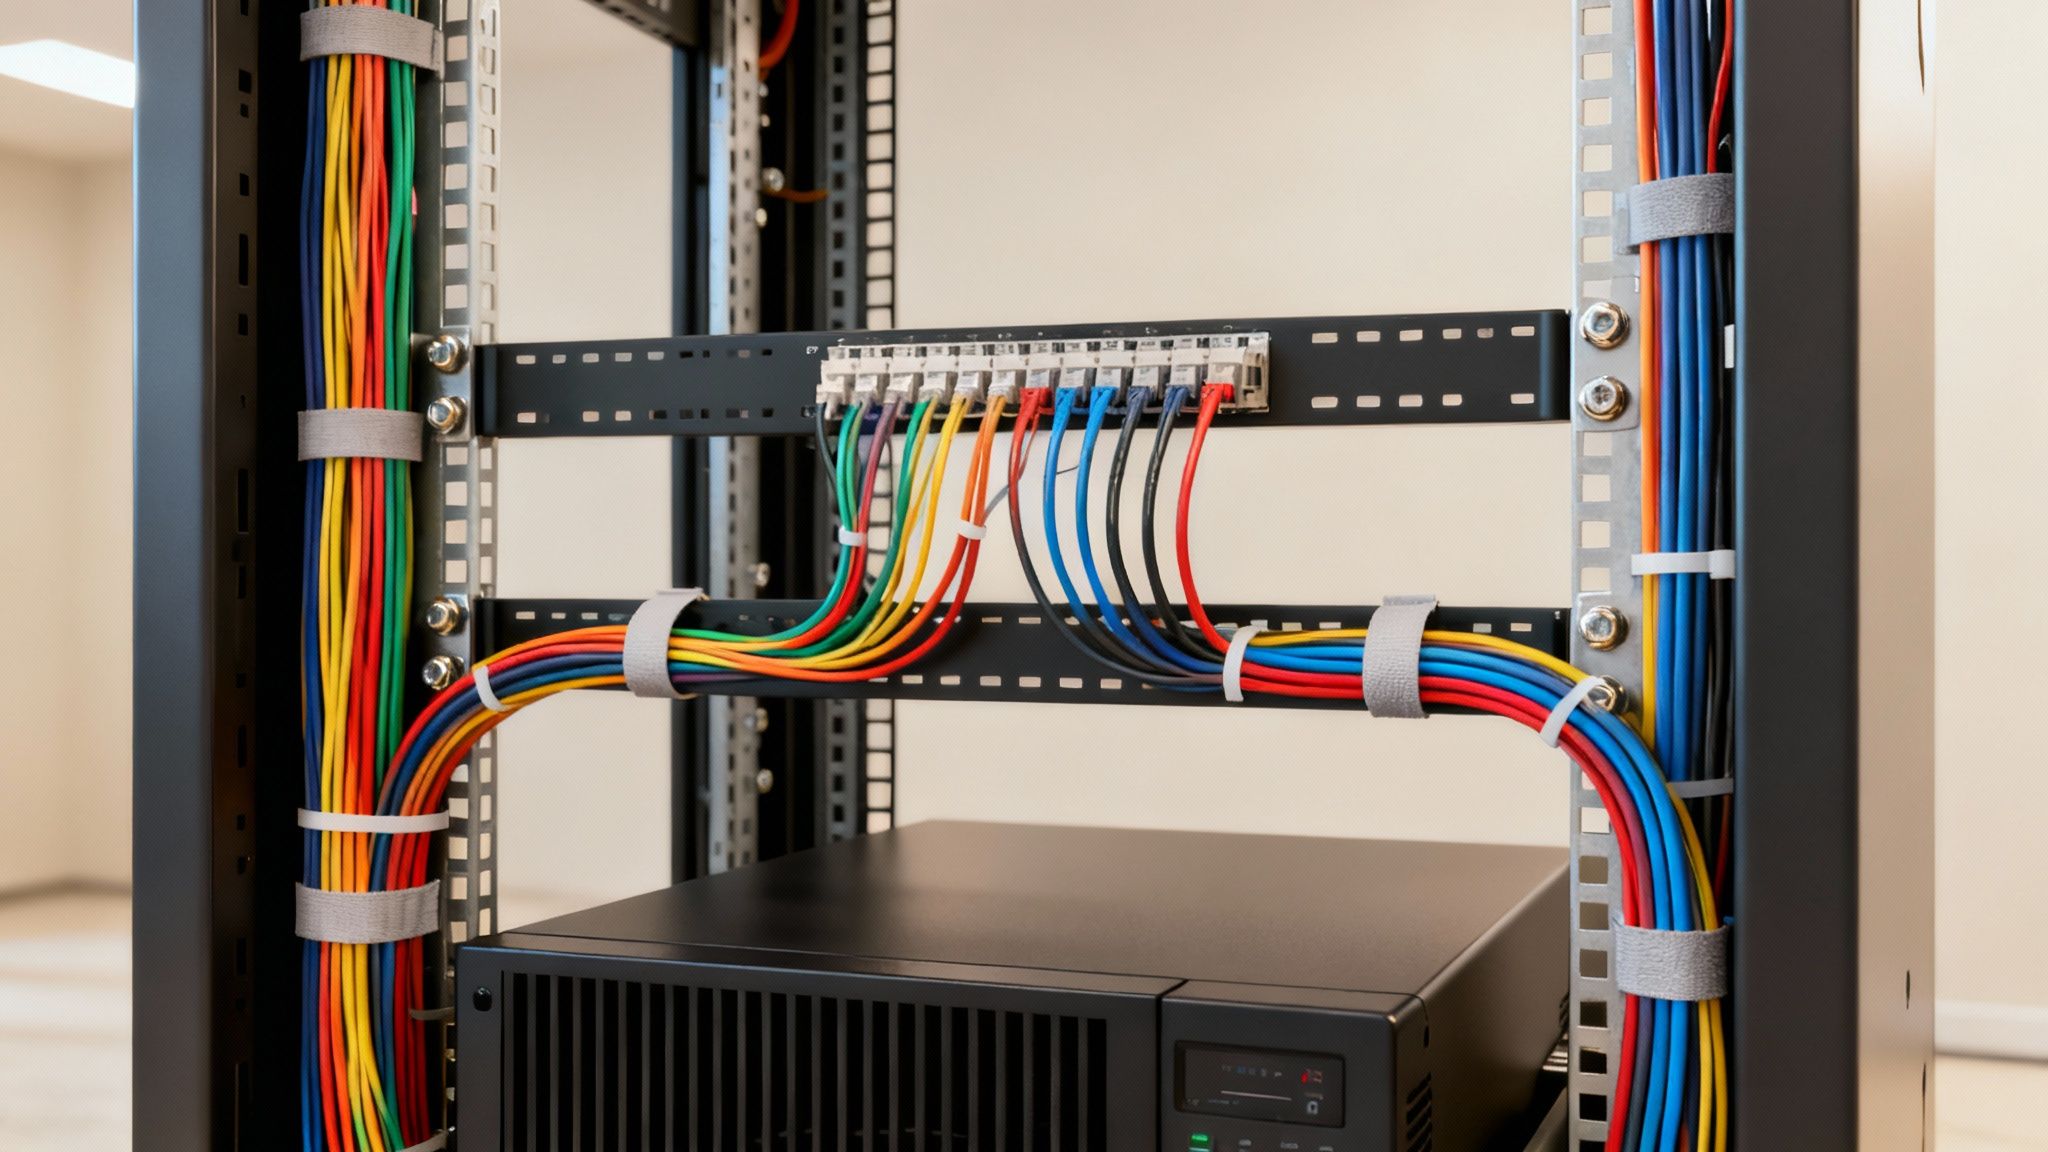
A Practical Guide to Cable Management and Mounting
An organised server rack is more than just a tidy workspace—it's absolutely essential for performance, proper airflow, and any future maintenance you'll need to do. That tangled rat's nest of cables, affectionately known as 'cable spaghetti', does more than just look messy. It chokes off airflow, which can lead to overheating, and turns a simple troubleshooting job into a time-consuming nightmare.
Let's move past vague advice and get into the practical, hands-on techniques that will help you master cable management and securely mount your valuable gear. This is all about eliminating clutter and protecting your investment.
Taming the Cable Spaghetti
Great cable management really comes down to two things: having the right tools and a solid plan. The aim is to create clean, logical pathways for every single cable, making them easy to trace, access, and change as your setup evolves.
Here are a few strategies that make a world of difference:
Use Vertical and Horizontal Managers: These accessories are the real backbone of a tidy rack. Horizontal managers guide cables neatly from your patch panels and switches, while vertical managers create clean channels running up and down the sides.
Colour-Code Your Cables: This simple tactic can save you hours when you're trying to fix something. Assign different colours to specific jobs—say, blue for networking, red for storage, and yellow for power. It’s a visual shortcut that makes identifying a connection instantaneous.
Embrace Velcro Ties: It’s tempting to use cheap plastic zip ties, but they’re a terrible choice for data cables. Cinch them too tight, and you can easily damage the delicate wires inside, hurting your network performance. Velcro ties are reusable, adjustable, and much gentler on your cables, making them the far better choice.
A well-managed rack isn't a one-time project; it's an ongoing discipline. When you set clear standards from the beginning, you make every future upgrade, replacement, or troubleshooting task simpler, saving a huge amount of time and cutting down on the risk of human error.
Secure Mounting Best Practices
Getting your hardware mounted correctly is every bit as important as managing the cables. This is all about ensuring stability, promoting the best possible airflow, and distributing weight safely. A poorly planned layout can damage equipment or, even worse, make the entire rack unstable.
Think of it like loading a heavy bookcase—you’d never put the heaviest encyclopaedias on the top shelf. The exact same logic applies here.
A Strategic Mounting Plan
Before you even think about sliding in the first server, take a moment to map out the layout. A bit of foresight now will save you a world of pain later and create a far more stable and efficient setup.
Heaviest Gear at the Bottom: Your heaviest equipment, like an Uninterruptible Power Supply (UPS) or a big storage array, must always go at the very bottom. This gives the rack a low centre of gravity, preventing it from becoming dangerously top-heavy.
Plan for Airflow: Group your equipment in a way that creates a logical path for air to move. Generally, you can put cooler-running gear like network switches near the top, while the real heat-producers (your servers) can be grouped in the middle. This allows hot air to rise and be exhausted effectively.
Use Cage Nuts Correctly: This is non-negotiable. Every piece of rack-mounted gear needs to be secured with four cage nuts and screws—one in each corner. Only using two is a common shortcut, but it's a risky one that leads to sagging equipment and damaged rails over time.
By combining disciplined cable management with a strategic mounting plan, you build a server rack environment that isn't just clean and accessible, but also safer and more reliable for the long haul. This approach protects your hardware and gives your team the confidence to maintain your most critical IT infrastructure.
Your Server Rack Installation and Maintenance Plan
A server rack isn't a "set and forget" appliance. Far from it. Getting the installation right is the foundation of a stable IT environment, but it's the ongoing, proactive maintenance that truly protects your investment and guarantees its long-term health.
Let's walk through a solid pre-installation checklist and then set up a simple, repeatable maintenance schedule to keep everything running smoothly.
Think of it like owning a high-performance car. The initial setup is about making sure every component is perfectly assembled and positioned. But the ongoing checks—the regular oil changes and tyre rotations—are what prevent small issues from turning into catastrophic failures on the motorway. This approach turns rack management from a reactive headache into a strategic advantage.
Pre-Installation Checklist: Your Blueprint for Success
Before you even think about unboxing that first server, you need to run through a pre-flight checklist. This simple step ensures the physical environment is ready, safe, and actually capable of supporting your new infrastructure. Rushing this stage is a recipe for disaster, often leading to problems that are incredibly difficult and expensive to fix later on.
Here are the absolute must-do checks:
Verify Floor Strength: A fully loaded 42U rack can easily weigh over 500 kg. You need to be certain that the floor in your chosen spot has the structural integrity to handle that load without any dramas.
Measure Your Space: Get the tape measure out. Check the rack's physical dimensions against the space, and don't forget about clearance. You'll want at least one metre of clear space at the front and back for access, plus enough ceiling height to stand the rack up safely.
Plan Your Power: Identify the dedicated power circuits you'll be using. Make sure they can handle the total calculated load of all your equipment, and then add a 25% safety margin. This little buffer is what prevents tripped breakers during peak usage.
Check for Proper Grounding: Electrical safety isn't optional. Verify the location has a proper earth ground connection. This protects your expensive equipment from power surges and, more importantly, keeps your staff safe from electrical hazards.
By methodically ticking off these boxes before you start, you eliminate the most common sources of failure and set yourself up for a smooth, successful deployment.
Establishing a Proactive Maintenance Routine
Once your rack is up and running, the game shifts to proactive upkeep. The best way to guarantee maximum uptime, peak performance, and a longer life for your hardware is a simple, consistent maintenance schedule. It doesn't need to be complex; it just needs to be done consistently.
A good maintenance plan is crucial for keeping your server rack and the equipment within it in top condition. The following checklist outlines key tasks to perform every quarter to prevent downtime and catch potential issues before they escalate.
Quarterly Server Rack Maintenance Checklist
Task Category | Specific Action | Status (Checkbox) | Notes |
|---|---|---|---|
Cooling & Airflow | Inspect and clean all fan units and dust filters. | ☐ | Check for unusual fan noise. |
Cabling & Connections | Visually check for loose or damaged cables. | ☐ | Ensure all connections are secure. |
Environmental | Confirm environmental monitors are online and reporting. | ☐ | Review temperature/humidity logs. |
Physical Security | Check that rack doors lock correctly. | ☐ | Verify no unauthorised access. |
By following a simple schedule like this, you create a system of checks and balances that ensures the long-term reliability of your critical infrastructure.
This kind of structured approach is at the heart of effective IT management. For New Zealand businesses, integrating these practices can be made even easier by working with an expert partner. To see how outsourcing can help maintain your critical systems, you can explore this guide to managed IT services for New Zealand businesses.
Frequently Asked Questions About Server Racks
Diving into the world of IT hardware can throw a lot of questions your way, especially when it's time to set up or overhaul your core infrastructure. To help clear things up, we’ve put together answers to some of the most common queries we hear from businesses about choosing and setting up a computer server rack.
How Do I Calculate the Right Size Computer Server Rack?
First things first, take stock of what you have right now. Make a list of all your rack-mountable gear and add up their heights in rack units (U). Got that number? Now, think about the future. You'll want to add at least 25-30% more capacity to give yourself room to grow.
For example, if your current equipment fills up 18U, a 24U rack might seem like enough, but you could easily outgrow it within a year. A standard 42U rack, on the other hand, gives you plenty of breathing room for future expansion.
Don't forget about depth, either. Measure your deepest piece of equipment and add a good 100mm on top of that for cables and airflow. It's almost always a safer bet to go for a deeper rack, somewhere in the 1000-1200mm range, to make sure you’re ready for whatever new hardware comes your way.
What Are the Most Important Accessories?
A rack is more than just a metal frame; it's an ecosystem. To get it right, there are a few accessories that are absolutely essential for a professional and manageable setup.
Power Distribution Unit (PDU): This is non-negotiable. A PDU is the only safe and organised way to get power from a single source to all your different devices.
Cable Management: Things can get messy fast. Using vertical managers and simple velcro ties keeps your wiring tidy, which is crucial for good airflow and preventing accidental disconnections.
Blanking Panels: Those empty U-spaces aren't just an eyesore; they disrupt airflow. Blanking panels cover these gaps, stopping hot and cold air from mixing and making your cooling system far more effective.
You might also want to consider rack shelves for any gear that isn't rack-mountable, or a dedicated fan unit if you need some extra cooling. For a broader perspective on how physical infrastructure fits into a modern IT strategy, our guide on leveraging cloud computing offers some valuable insights.
Can I Put a Server Rack in a Regular Office?
The ideal spot for a server rack is always a dedicated, climate-controlled server room, but we know that’s not always an option. If you have to place a rack in an office space, you absolutely must use an enclosed cabinet—not an open frame—to keep the noise from server fans under control.
Make sure the spot has enough ventilation to let heat escape and is well away from busy walkways. It’s also vital to connect it to a dedicated power circuit so you don’t trip the main office breakers. And remember, a fully loaded rack is incredibly heavy, so always check that the floor can handle the weight.
At Wisely, we help organisations across New Zealand and Australia design and implement robust IT infrastructure that supports growth. From planning your server rack to managing your entire technology stack, we provide the expertise to ensure your systems are efficient, secure, and reliable. Learn how we can support your business at https://www.wiselyglobal.tech.
Comments